How to design a rooftop garden with drainage solutions and waterproofing? It sounds complex, right? But transforming a barren rooftop into a lush oasis is totally achievable! This guide breaks down the process, from initial planning and crucial waterproofing to creating a thriving drainage system and selecting the perfect plants. Get ready to ditch the concrete jungle and embrace the urban farm life – because your rooftop garden awaits!
We’ll cover everything from assessing your roof’s structural integrity and navigating building codes to choosing the right waterproofing membrane and designing a drainage system that prevents waterlogging. Learn how to select plants that thrive in rooftop environments, build raised beds or containers, and even install an irrigation system. We’ll also share tips for ongoing maintenance to keep your rooftop garden flourishing for years to come.
So, let’s get started on your green rooftop revolution!
Planning Your Rooftop Garden
Transforming your rooftop into a vibrant green space requires meticulous planning. Ignoring crucial factors like weight distribution and structural integrity can lead to costly repairs or even structural damage. This section will guide you through the essential steps to ensure your rooftop garden is both beautiful and safe.
Rooftop Garden Layout and Weight Distribution
Designing a rooftop garden layout involves more than just aesthetically pleasing arrangements. The weight of soil, plants, and irrigation systems can significantly impact your building’s structure. Careful consideration of weight distribution is paramount to prevent overloading and potential damage. This includes understanding the load-bearing capacity of your rooftop and strategically placing heavier elements. A well-planned layout minimizes stress on the roof structure, ensuring longevity and safety.
Plant Selection and Weight Estimation, How to design a rooftop garden with drainage solutions and waterproofing
Choosing the right plants is crucial for a successful rooftop garden. Consider factors like mature size, root systems, and water requirements. Heavier plants, such as large shrubs or trees, should be strategically placed to distribute weight evenly. Here’s a sample table to help you estimate plant weight and size:
| Plant Name | Mature Size (approx.) | Estimated Weight (approx.) | Sun/Shade Requirements |
|---|---|---|---|
| Sedum spp. (Stonecrop) | 6-12 inches tall, spreading | Light (negligible structural impact) | Full sun to partial shade |
| Lavender | 1-3 feet tall | Light to Moderate | Full sun |
| Rosemary | 2-4 feet tall | Moderate | Full sun |
| Dwarf Japanese Maple | 6-8 feet tall | Moderate to Heavy | Partial shade |
Note: These weights are estimates and can vary depending on the size and health of the plant. Consult with a horticulturalist for more precise weight estimations for specific plants and soil types.
Assessing Rooftop Structural Load Capacity
Before you even begin designing, you must determine your rooftop’s load-bearing capacity. This involves consulting your building’s structural plans or engaging a structural engineer to assess the roof’s ability to support the added weight of a garden. The engineer will consider factors like the roof’s design, materials, and existing loads. They’ll provide a report detailing the maximum permissible weight for your rooftop garden, guiding your plant selection and design.
This step is crucial to prevent structural damage and ensure the safety of your building. Ignoring this step could lead to significant problems down the line.
Relevant Building Codes and Regulations
Constructing a rooftop garden often requires adhering to specific building codes and regulations. These vary by location and may address issues such as weight limitations, waterproofing requirements, drainage systems, and fire safety. It is essential to check with your local building department to obtain the necessary permits and ensure compliance with all applicable regulations. Failure to comply could result in fines or even demolition orders.
Consulting with a qualified contractor experienced in rooftop garden construction can help navigate these regulations.
Waterproofing the Rooftop
Creating a thriving rooftop garden requires a robust waterproofing system. Neglecting this crucial step can lead to costly repairs, structural damage, and the complete failure of your garden project. Choosing the right waterproofing membrane and installing it correctly is paramount to the longevity and success of your rooftop oasis.
Several waterproofing membrane options exist, each with its own set of advantages and disadvantages concerning lifespan, cost, and maintenance. The best choice depends on factors like budget, climate, and the specific requirements of your rooftop garden design. Proper installation is just as crucial as the material selection itself; improper application can negate the benefits of even the highest-quality membrane.
Waterproofing Membrane Options
Selecting the appropriate waterproofing membrane is a critical decision. The following Artikels several common options, comparing their characteristics to aid in informed decision-making.
- EPDM (Ethylene Propylene Diene Monomer): This rubber membrane is known for its durability and flexibility.
- Pros: Long lifespan (up to 50 years), relatively inexpensive, easy to install, highly resistant to UV radiation and punctures.
- Cons: Can be susceptible to damage from sharp objects, requires careful seaming to prevent leaks, may require specialized tools for installation.
- TPO (Thermoplastic Polyolefin): A single-ply membrane offering excellent resistance to UV radiation and punctures.
- Pros: Durable, lightweight, relatively easy to install, reflects sunlight to reduce heat buildup.
- Cons: Can be more expensive than EPDM, susceptible to damage from extreme temperature fluctuations, requires proper seaming techniques.
- PVC (Polyvinyl Chloride): A durable and cost-effective option, but with a shorter lifespan than EPDM or TPO.
- Pros: Relatively inexpensive, easy to install, available in various colors and thicknesses.
- Cons: Shorter lifespan (15-20 years), susceptible to UV degradation, can become brittle over time, requires careful handling to avoid punctures.
- Spray-applied polyurethane: Offers seamless coverage and excellent adhesion to various substrates.
- Pros: Forms a seamless, waterproof barrier, excellent adhesion, can be applied to complex shapes.
- Cons: Requires specialized equipment and skilled applicators, can be more expensive than other options, susceptible to UV degradation if not properly protected.
Waterproofing Membrane Installation
Proper installation is key to a successful waterproofing system. The process typically involves several steps, from surface preparation to final curing.
- Surface Preparation: Thoroughly clean the rooftop surface, removing all debris, dirt, and loose materials. Repair any cracks or imperfections using appropriate patching compounds. The surface should be dry and free of any contaminants before application.
- Membrane Application: The specific application technique varies depending on the chosen membrane type. EPDM and TPO membranes are typically laid out and seamed using adhesive or heat welding. PVC membranes may be adhered using adhesive or mechanically fastened. Spray-applied polyurethane is applied using specialized equipment.
- Seaming and Flashing: Seams and flashing around penetrations (pipes, vents, etc.) are critical areas that require meticulous attention to detail. Proper seaming techniques are crucial to prevent leaks. Flashing materials should be compatible with the chosen membrane.
- Curing Time: Allow sufficient curing time for the membrane to fully adhere and reach its optimal strength. This time varies depending on the membrane type, weather conditions, and the manufacturer’s recommendations. Avoid placing any weight or stress on the membrane during the curing period.
Applying Waterproofing Sealant
Even with a properly installed membrane, additional sealant may be needed in vulnerable areas to prevent leaks. A step-by-step guide ensures a thorough and effective application.
- Identify vulnerable areas: Inspect the membrane for any potential weak points, such as seams, penetrations, or areas with movement. These areas require extra attention and sealing.
- Surface preparation: Clean the areas to be sealed with a suitable cleaner, ensuring they are dry and free of dust or debris. Any loose or damaged material should be removed.
- Sealant application: Apply the sealant according to the manufacturer’s instructions. Use a suitable applicator, such as a caulking gun or brush, to ensure even coverage. For larger areas, consider using a trowel or roller.
- Smoothing and curing: Smooth the sealant to create a continuous and even layer. Allow sufficient curing time before placing any weight or stress on the sealed areas. This ensures proper adhesion and prevents cracking.
Drainage System Design

Creating a robust drainage system is crucial for the longevity and health of your rooftop garden. Poor drainage can lead to waterlogged soil, root rot, and structural damage to your roof. This section Artikels the design and calculation aspects of a successful drainage system.
A well-designed drainage system efficiently removes excess water, preventing problems and ensuring a thriving garden. Key components include a graded gravel layer, perforated drainage pipes, and overflow outlets. These work together to collect, channel, and safely discharge water from your rooftop garden.
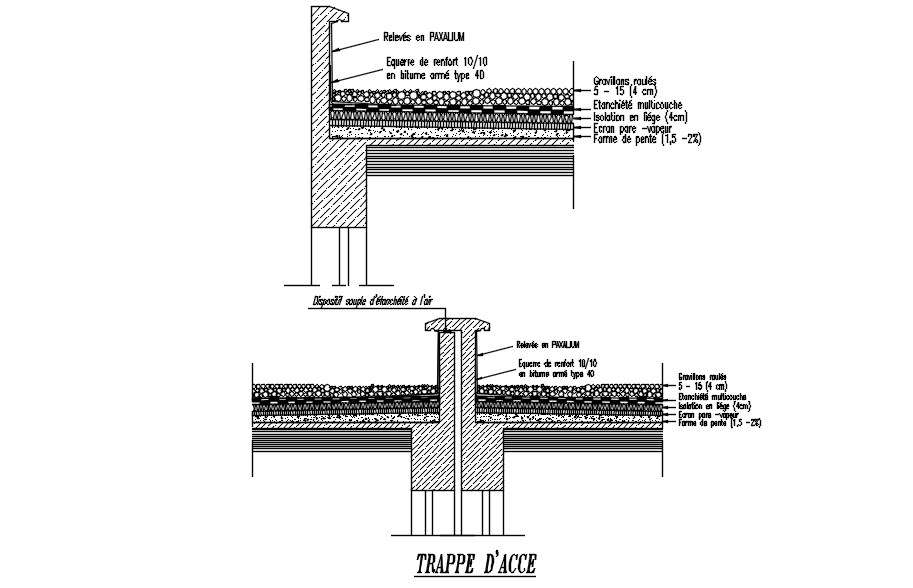
Drainage System Diagram
The following diagram illustrates a typical drainage system for a rooftop garden. Imagine a cross-section view of your rooftop garden. The system starts with a layer of geotextile fabric to prevent soil from clogging the drainage layer. Above this is a layer of gravel, providing excellent drainage. Perforated pipes are laid within the gravel layer, collecting water and directing it to the downspouts or designated outlets.
An additional layer of gravel sits above the pipes before the soil and plants are added. Overflow outlets are crucial to prevent water accumulation in case of exceptionally heavy rainfall.
| Material | Quantity (Example for a 100 sq ft garden) | Estimated Cost (USD) |
|---|---|---|
| Geotextile Fabric | 1 roll (100 sq ft) | $50 |
| Gravel (3/4″ to 1″) | 2 cubic yards | $150 |
| 4″ Perforated Drainage Pipe | 50 linear feet | $100 |
| Overflow Outlets | 2 | $50 |
Drainage Capacity Calculation
Determining the necessary drainage capacity involves considering the garden’s area and the expected rainfall. The formula below provides a basic calculation. Remember, this is a simplified approach; consulting a professional for larger or complex projects is recommended.
Drainage Capacity (gallons/minute) = (Garden Area (sq ft)
- Rainfall Intensity (inches/hour)) / (60 minutes/hour
- 1 sq ft = 7.48 gallons)
For example, a 100 sq ft garden in an area with an average rainfall intensity of 4 inches/hour would require a drainage capacity of approximately 44.8 gallons/minute. This calculation is a simplified estimate and doesn’t account for factors such as soil type and slope.
Slope and Grading
Proper slope and grading are essential to prevent waterlogging. A consistent slope, typically around 1-2% (1-2 inches of drop per 10 feet), should be created across the rooftop garden. This ensures water flows consistently towards the drainage pipes and outlets. Improper grading can lead to water pooling in certain areas, damaging plants and potentially compromising the roof’s structure.
Accurate grading is crucial for the effective functioning of the entire drainage system, preventing water from accumulating and causing damage.
Designing a rooftop garden requires careful planning, especially concerning drainage and waterproofing to prevent structural damage. Before you even start planting, consider the overall budget; you might find yourself checking out the rh rooftop menu prices if you’re planning a celebratory launch party once your green oasis is complete. Proper drainage solutions and a robust waterproofing system are crucial for a long-lasting, thriving rooftop garden.
Choosing Plants and Soil
Creating a thriving rooftop garden requires careful consideration of the plants you choose and the soil you use. The right plant selection, matched with a well-draining and nutrient-rich soil mix, is crucial for success. Ignoring these factors can lead to plant stress, stunted growth, and ultimately, a failed garden. Let’s explore the key elements of plant and soil selection for your rooftop oasis.
Suitable Plant Species for Rooftop Gardens
Choosing plants appropriate for your rooftop environment is paramount. Consider sunlight exposure and water requirements to ensure your plants thrive. Here’s a breakdown of suitable plant species categorized by their needs:
- Sun-Loving Plants (6+ hours of direct sunlight): Sedum, Sempervivum (hens and chicks), Lavender, Rosemary, Thyme. These plants tolerate dry conditions and intense sun, making them ideal for many rooftop environments.
- Part-Sun Plants (4-6 hours of direct sunlight): Coreopsis, Dianthus, Yarrow, Coneflower. These plants prefer a balance of sun and shade, and can tolerate some dryness.
- Shade-Loving Plants (less than 4 hours of direct sunlight): Hosta, Ferns, Impatiens, Coleus. These plants thrive in shaded areas and require consistently moist soil.
- Drought-Tolerant Plants: Many succulents, such as echeveria and sempervivum, are incredibly drought-tolerant and ideal for rooftop gardens where consistent watering may be challenging. They require well-draining soil and infrequent watering.
Rooftop Garden Soil Mix Composition
The soil mix for your rooftop garden needs to be specially formulated to address the unique challenges of this environment. It must balance good drainage to prevent waterlogging with sufficient nutrient retention to support healthy plant growth. Aeration is also crucial to prevent compaction and ensure healthy root development.A suitable mix might consist of:
One part topsoil, one part compost, one part perlite or vermiculite.
Topsoil provides essential nutrients, compost improves soil structure and adds organic matter, while perlite or vermiculite enhances drainage and aeration. Adjusting the proportions based on your specific soil type and plant needs may be necessary. For example, if your topsoil is particularly clay-heavy, you may increase the proportion of perlite or vermiculite.
Planting Scheme and Plant Spacing
Careful planning of your planting scheme is vital for maximizing space and minimizing competition among plants for resources. Consider the mature size of each plant and space them accordingly to prevent overcrowding. Overcrowding can lead to increased competition for water, nutrients, and sunlight, resulting in stunted growth and disease.A staggered planting pattern, where plants are not planted in perfectly straight rows, can improve light penetration and airflow, which reduces the risk of fungal diseases.
Designing a rooftop garden requires careful planning, especially concerning drainage and waterproofing to prevent structural damage. For inspiration on creating a stunning, functional outdoor space, check out the menu at the rh rooftop menu edina , noting their likely sophisticated approach to landscape design. This attention to detail translates directly to your own project; proper drainage systems and robust waterproofing are key to a thriving, long-lasting rooftop oasis.
Larger plants should be placed at the back or sides, allowing smaller plants to receive adequate sunlight. Consider incorporating taller plants as focal points to create visual interest and depth. Thorough research on individual plant growth habits is crucial for successful spacing.
Constructing the Garden: How To Design A Rooftop Garden With Drainage Solutions And Waterproofing

Building your rooftop garden requires careful consideration of weight distribution and structural integrity. Remember, you’re adding significant weight to your roof, so robust construction is key. Choosing the right materials and building techniques will ensure longevity and prevent damage to your building.Raised garden beds and containers offer a practical and aesthetically pleasing solution for rooftop gardening. They provide better soil control, improved drainage, and minimize the load on the roof compared to directly planting on the rooftop membrane.
Raised Garden Bed Construction
Constructing raised beds involves selecting appropriate materials and assembling them securely. Popular choices include treated lumber (ensure it’s specifically treated for ground contact to prevent rot), recycled plastic lumber (a sustainable and low-maintenance option), or even repurposed materials like metal containers or large planters. The beds should be at least 8 inches deep to accommodate sufficient soil volume for plant roots.
To ensure stability, consider adding cross-bracing or securing the beds to the rooftop structure using appropriate fasteners. For example, a 4×4 foot bed made from treated lumber might require four corner posts and two internal supports for strength, fastened together using galvanized screws and exterior-grade wood glue.
Container Gardening Techniques
Container gardening provides flexibility and portability. Large containers, such as half wine barrels, large ceramic pots, or even upcycled tubs, can create stunning focal points. Ensure the containers have adequate drainage holes to prevent waterlogging. Smaller containers can be grouped together to create a visually appealing and diverse planting scheme. For instance, a combination of terracotta pots in varying sizes planted with herbs and succulents would create a charming Mediterranean-style corner.
Consider the weight of the containers when full of soil and plants; heavier materials may require more robust structural support beneath them.
Irrigation System Installation
An efficient irrigation system is crucial for a thriving rooftop garden. A drip irrigation system is ideal, delivering water directly to the roots of plants, minimizing water waste and preventing runoff. This system involves laying out flexible tubing along the rows of plants, with small emitters spaced evenly to provide a slow, consistent drip. A timer can be attached to automate the watering schedule.
For example, a timer set to deliver 15 minutes of watering twice a day would provide adequate moisture for most plants, although this will depend on factors like sunlight exposure and plant type. Remember to use UV-resistant tubing to prevent premature degradation.
Creative Design Elements
Incorporating creative design elements can transform your rooftop garden into a stunning oasis. Consider adding vertical elements like trellises or climbing plants to maximize space and add visual interest. Incorporating pathways made from gravel, pavers, or reclaimed wood can provide a functional and aesthetically pleasing element. Strategic placement of lighting can highlight key features and extend the enjoyment of your rooftop garden into the evening.
For example, string lights draped around a pergola, combined with strategically placed solar-powered pathway lights, create a magical atmosphere. The use of different textures and colors in plants and materials can add depth and visual interest to the overall design.
Ongoing Maintenance

Maintaining a thriving rooftop garden requires consistent effort. Neglecting regular upkeep can lead to problems ranging from unsightly weeds to structural damage. A well-defined maintenance schedule is crucial for ensuring the longevity and beauty of your rooftop oasis. This involves a proactive approach to watering, fertilizing, pest control, and regular inspections of your waterproofing and drainage systems.A dedicated maintenance plan minimizes potential issues and maximizes the lifespan of your rooftop garden.
This section Artikels a practical schedule and addresses common challenges encountered in rooftop gardening.
Rooftop Garden Maintenance Schedule
Regular maintenance is key to a healthy rooftop garden. The following table Artikels a sample schedule; adjust it based on your specific plant choices, climate, and the needs of your garden.
| Task | Frequency | Materials Needed | Potential Issues |
|---|---|---|---|
| Watering | Daily (adjust based on weather and plant needs) | Watering can, hose, soaker hoses | Overwatering leading to root rot; underwatering causing wilting and stunted growth. Monitor soil moisture regularly. |
| Fertilizing | Every 2-4 weeks (spring and summer) | Balanced liquid fertilizer, slow-release granular fertilizer | Over-fertilization causing nutrient burn; under-fertilization resulting in weak growth. Follow fertilizer instructions carefully. |
| Weeding | As needed | Hand weeding tools, gloves | Weeds competing with plants for resources. Regular weeding prevents weed infestations. |
| Pest Control | As needed (monitor for signs of pests) | Insecticidal soap, neem oil, beneficial insects | Pest infestations damaging plants. Early detection and treatment are crucial. Consider organic pest control methods. |
| Inspection of Waterproofing and Drainage | Monthly | Visual inspection, possibly a moisture meter | Leaks in the waterproofing membrane; clogged drainage system. Address any issues promptly to prevent damage. |
Addressing Common Rooftop Garden Problems
Rooftop gardens face unique challenges due to their exposed location. Understanding and proactively addressing these issues is vital for maintaining a healthy and productive garden.Root rot, often caused by overwatering or poorly draining soil, is a common problem. Symptoms include wilting, yellowing leaves, and a foul odor emanating from the soil. Improving drainage and ensuring adequate aeration are key preventative measures.
In severe cases, affected plants may need to be removed and replaced.Wind damage can be significant, especially in exposed locations. Windbreaks, such as strategically placed taller plants or physical barriers, can offer protection. Choosing wind-tolerant plant varieties is also crucial. Securing plants with stakes or supports can prevent them from being uprooted or damaged.Extreme temperatures, both heat and cold, can stress plants.
Providing shade during hot periods and protection from frost during cold spells is essential. Mulching can help regulate soil temperature and retain moisture. Selecting plants suited to your local climate’s temperature extremes is vital.
Importance of Regular System Inspections
Regular inspections of the waterproofing and drainage systems are not optional; they are essential for the long-term health and viability of your rooftop garden. Neglecting these systems can lead to costly repairs, structural damage to the building, and the loss of your entire garden. A monthly visual inspection for cracks, leaks, or blockages in the drainage system is recommended.
Addressing any issues promptly prevents minor problems from escalating into major ones.