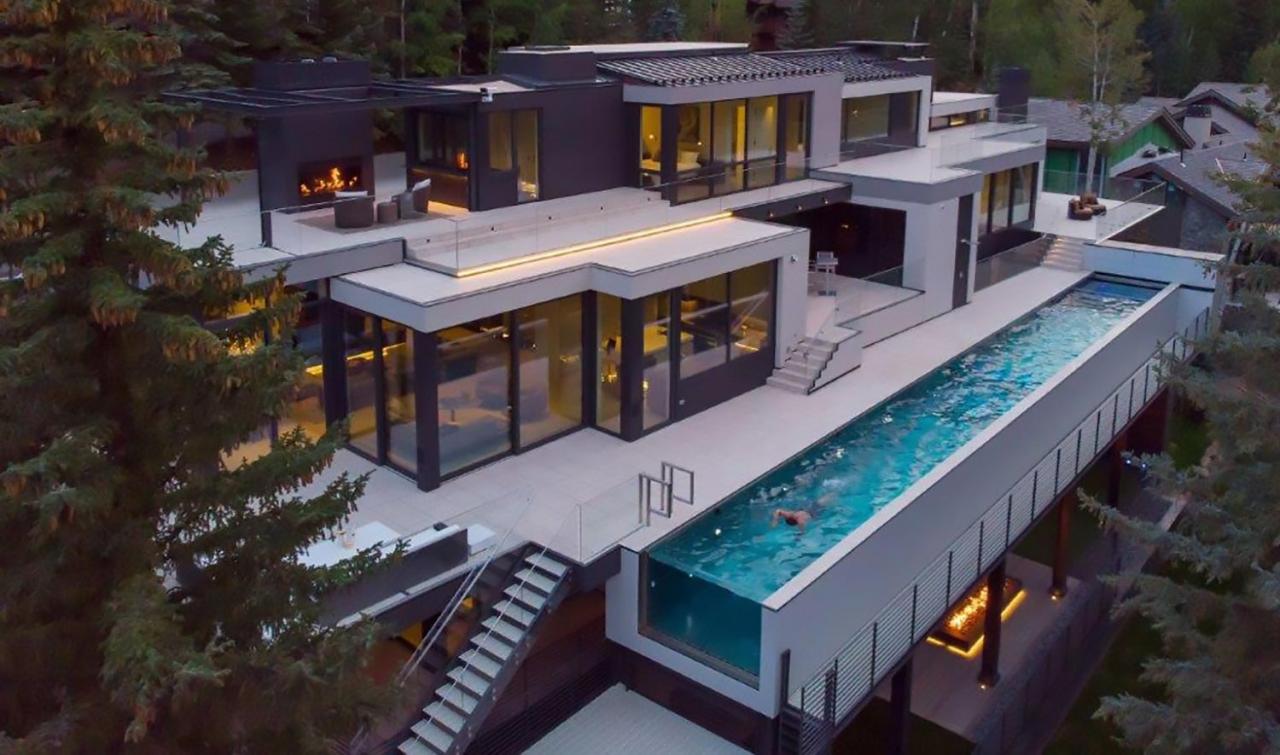
Designing a rooftop pool area with safety features and privacy is a major undertaking, demanding meticulous planning and attention to detail. From navigating complex building codes and ensuring structural integrity to crafting a tranquil oasis with privacy screens and thoughtful lighting, this project blends technical expertise with aesthetic vision. This guide delves into the crucial aspects of creating a luxurious and secure rooftop pool haven, covering everything from essential safety regulations and structural considerations to the artistry of enhancing privacy and ambiance.
Successfully building a rooftop pool involves a multi-faceted approach. It’s not just about the aesthetics; it’s about ensuring the safety of everyone using the pool and respecting the privacy of those around it. This means understanding and complying with building codes, assessing the structural load-bearing capacity of the roof, implementing robust waterproofing and drainage systems, and creatively incorporating privacy solutions.
Consideration also needs to be given to accessibility, equipment maintenance, and the creation of a relaxing ambiance through thoughtful lighting design.
Safety Regulations and Compliance
Designing a rooftop pool area requires meticulous attention to safety, going beyond aesthetic appeal. Strict adherence to building codes and regulations is paramount, ensuring the safety of residents and preventing potential liabilities. This section details the crucial aspects of safety regulations and compliance necessary for a successful and legally sound project.
Relevant Building Codes and Regulations for Rooftop Pool Areas
Building codes vary by location, but common regulations often include structural load capacity assessments for the roof to handle the weight of the pool, surrounding structures, and occupants. These assessments must account for water pressure, the weight of the pool itself, and potential snow loads. Furthermore, regulations address waterproofing and drainage to prevent leaks and water damage to the building’s structure.
Specific requirements for barrier fencing, emergency access points, and lighting are also typically mandated. Consult your local building department for the precise regulations applicable to your area. Ignoring these codes can lead to costly fines and even legal action.
Necessary Safety Certifications for Pool Construction and Equipment
The construction of the pool itself, as well as its associated equipment, must meet stringent safety standards. This often involves certifications from recognized bodies ensuring the pool’s structural integrity, water filtration systems, and electrical components meet safety guidelines. For example, pool pumps and filters must adhere to standards set by organizations like Underwriters Laboratories (UL) or similar internationally recognized standards.
Regular inspections and maintenance by certified professionals are crucial for ensuring continued compliance. Failure to obtain and maintain these certifications can result in operational restrictions or even closure of the pool.
Obtaining Permits for a Rooftop Pool
Securing the necessary permits is a crucial step in the process. This typically involves submitting detailed plans to the local building department, including engineering calculations demonstrating the roof’s structural capacity, detailed specifications of the pool and its equipment, and a comprehensive safety plan. The application process can be lengthy, requiring multiple submissions and approvals from various departments. Failing to obtain the necessary permits before starting construction can lead to significant delays, penalties, and potential demolition of any unauthorized work.
Designing a stunning rooftop pool area requires careful consideration of safety features, from secure fencing to non-slip surfaces. Privacy is equally crucial, perhaps achieved with strategically placed planters or a retractable awning. For inspiration on luxurious rooftop spaces, check out the upscale ambiance and menu options at the rh rooftop menu edina ; their design aesthetic might offer some great ideas for your own project.
Ultimately, a well-designed rooftop pool area balances relaxation with responsible safety precautions.
Thorough preparation and proactive communication with the local authorities are essential.
Examples of Safety Features Mandated by Local Ordinances
Many local ordinances mandate specific safety features for rooftop pools. These often include: fencing at least four feet high surrounding the pool area, self-closing and self-latching gates, anti-entrapment drain covers to prevent accidents, and appropriate lighting to enhance visibility at night. Emergency telephones and readily accessible life-saving equipment, such as life rings and reaching poles, are also commonly required.
The specific requirements vary greatly depending on location and the size and type of pool.
| Safety Feature | Description | Estimated Cost (USD) | Notes |
|---|---|---|---|
| Four-foot high fence | Surrounding fence with self-closing, self-latching gate. | $2,000 – $5,000 | Cost varies based on materials and perimeter. |
| Anti-entrapment drain covers | Drain covers designed to prevent hair and limbs from getting trapped. | $500 – $1,000 per drain | Multiple drains may increase cost significantly. |
| Emergency telephone | Direct line to emergency services. | $500 – $1,000 | Installation costs may vary. |
| Life rings and reaching poles | Essential rescue equipment. | $200 – $500 | Prices vary based on quality and quantity. |
Structural Integrity and Load-Bearing Capacity
Building a rooftop pool is a luxurious undertaking, but it demands meticulous planning, especially concerning the structural integrity of your building. The weight of the pool, water, and occupants places significant stress on the roof structure, necessitating a thorough assessment and potentially significant reinforcement. Ignoring these crucial factors can lead to catastrophic structural failure. This section Artikels the critical engineering considerations to ensure your dream pool doesn’t become a nightmare.The weight of a filled pool, its structural components, and the anticipated number of occupants significantly impacts the roof’s load-bearing capacity.
This added weight must be carefully calculated and compared against the existing structural limits to determine the necessary reinforcement. Underestimating these loads can lead to cracking, sagging, or even complete roof collapse. Therefore, accurate weight calculations and structural analysis are paramount.
Rooftop Weight Capacity Determination
Determining the existing weight capacity of your rooftop structure is the first crucial step. This involves reviewing the original building plans and specifications, which should detail the roof’s design load. If these documents are unavailable or incomplete, a structural engineer must conduct a thorough assessment. This assessment often involves non-destructive testing methods like visual inspections, core sampling, and load testing to evaluate the existing structural members (beams, columns, and foundation) and determine their current load-bearing capacity.
The engineer will calculate the existing dead load (the weight of the roof structure itself) and live load (the weight of people, furniture, and other movable objects) the roof can safely support. Comparing this capacity to the projected weight of the pool and its contents will reveal whether reinforcement is necessary. For example, a standard in-ground pool of 10,000 gallons of water would weigh approximately 83,000 pounds (excluding the pool’s structure and additional loads).
Roof Reinforcement Methods
Once the weight capacity is determined and a shortfall is identified, reinforcement is necessary. Several methods can strengthen the roof to accommodate the added weight. These include:
- Adding Steel Beams or Columns: Installing additional steel beams or columns beneath the roof structure can significantly increase its load-bearing capacity. These new structural members distribute the weight more effectively, reducing stress on the existing elements. The size and placement of these additions are determined by a structural engineer based on the specific load requirements.
- Reinforced Concrete Slabs: If the roof is a concrete slab, reinforcing it with additional steel rebar and concrete can improve its strength and stiffness. This method involves carefully pouring additional concrete over the existing slab, ensuring proper bonding for optimal structural integrity. The thickness of the added concrete layer will depend on the calculated load requirements.
- Strengthening Existing Structural Members: Existing beams and columns can be strengthened through techniques like adding steel plates or jacketing. This involves wrapping the existing members with steel plates or a concrete jacket to increase their cross-sectional area and improve their resistance to bending and compression. The engineer will specify the appropriate strengthening method and material based on the existing structure’s condition and load requirements.
Step-by-Step Structural Stability Assessment
A systematic approach is crucial for ensuring structural stability. The process involves the following steps:
- Initial Assessment: Review existing building plans and specifications to determine the original design loads. Conduct a visual inspection of the roof structure for any signs of damage or deterioration.
- Load Calculation: Calculate the total weight of the proposed pool, including water, pool structure, and anticipated occupancy. Consider additional loads like equipment, furniture, and future maintenance.
- Structural Analysis: A structural engineer will perform a detailed analysis to determine the existing load-bearing capacity of the roof and compare it to the calculated load from the pool. This analysis will consider the material properties, geometry, and support conditions of the existing structure.
- Reinforcement Design: If the existing capacity is insufficient, the engineer will design the necessary reinforcement, specifying the type, size, and location of additional structural members or strengthening techniques.
- Construction and Inspection: The reinforcement work must be carried out by qualified contractors, following the engineer’s specifications. Regular inspections are essential to ensure compliance with the design and safety standards.
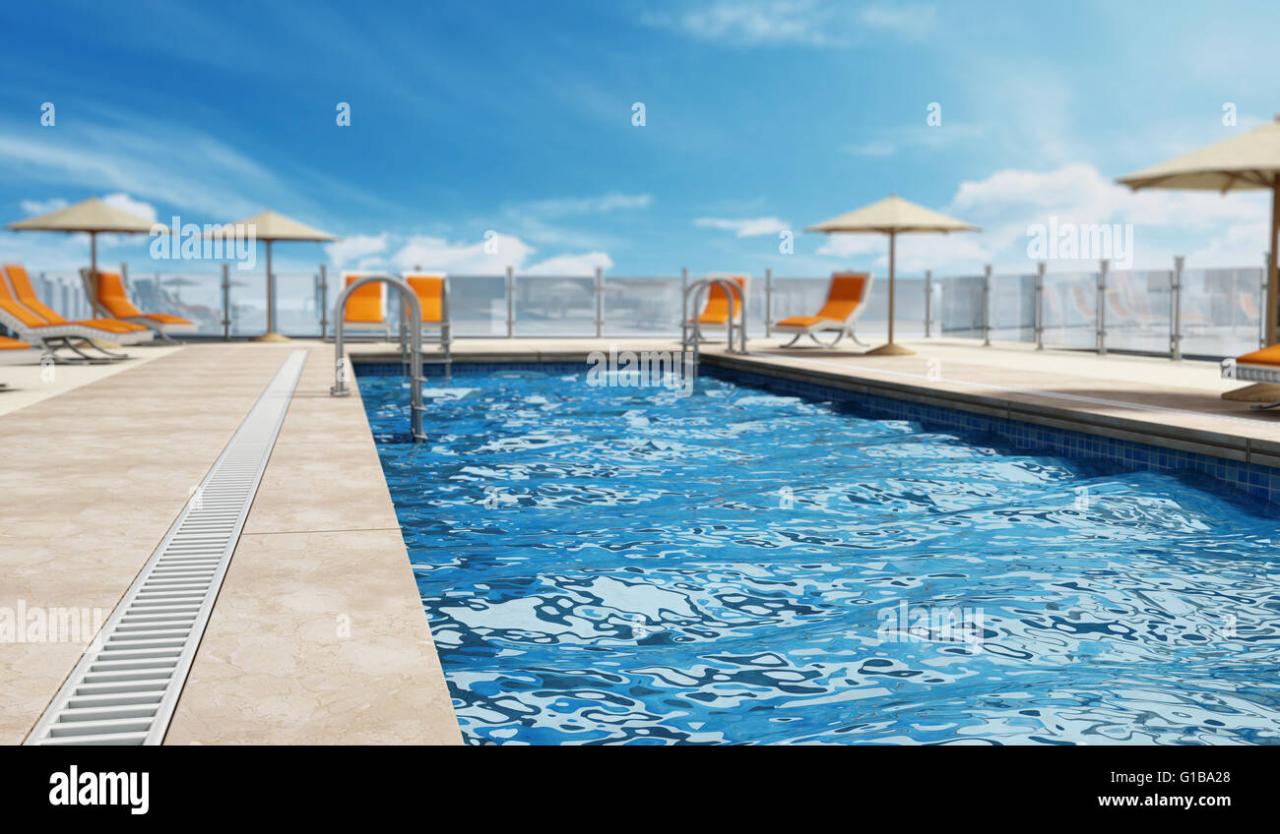
Waterproofing and Drainage Systems: Designing A Rooftop Pool Area With Safety Features And Privacy

Creating a stunning rooftop pool is only half the battle; ensuring its longevity and preventing catastrophic water damage is the other. A robust waterproofing and drainage system is paramount, not just for the structural integrity of the building but also for the safety and enjoyment of the pool users. Neglecting this crucial aspect can lead to costly repairs, mold growth, and even structural collapse.A comprehensive waterproofing system safeguards the building from water infiltration, protecting the structural elements from deterioration and preventing leaks into lower floors.
Effective drainage prevents water from accumulating on the roof, minimizing the risk of ponding, which can overburden the waterproofing membrane and lead to failures. Properly designed drainage also redirects water away from sensitive areas, ensuring the longevity of the entire rooftop pool area.
Waterproofing Materials and Application
The choice of waterproofing material depends on several factors, including budget, the type of substrate, and the anticipated level of water exposure. Common materials include polyurethane membranes, which are known for their flexibility and seamless application, ideal for complex shapes and detailing. These membranes are applied using specialized spray equipment or by hand-rolling. Another option is ethylene propylene diene monomer (EPDM) rubber sheeting, a durable and long-lasting solution often preferred for its ease of installation and resistance to UV degradation.
This is typically installed by adhering the sheets to the substrate using adhesives. Finally, cementitious waterproofing systems, composed of specialized cement-based materials, offer excellent protection against water penetration and are frequently used in conjunction with other waterproofing layers. Application involves meticulous mixing and application to ensure a smooth, even coating.
Drainage System Design and Implementation, Designing a rooftop pool area with safety features and privacy
An effective drainage system is critical in preventing water accumulation. This typically involves a combination of elements. First, a sloped surface directs water towards designated drainage points. The slope should be carefully calculated to ensure efficient water flow, typically around 1-2% gradient. Second, strategically placed scuppers or drains channel water away from the pool area.
These should be sized appropriately to handle the expected water volume and be connected to a robust downspout system. Third, a properly designed overflow system prevents the pool from overfilling during heavy rainfall. This system often incorporates a dedicated drain or channel that redirects excess water to the main drainage system. The entire system should be regularly inspected and cleaned to ensure its optimal functionality.
Consideration must be given to potential clogging from debris and regular maintenance schedules implemented to prevent this.
Maintaining Waterproofing and Drainage Systems
Regular maintenance is essential to prolong the life of the waterproofing and drainage systems. This includes periodic inspections for any signs of damage, cracks, or leaks. For instance, a visual inspection should be carried out at least twice a year, checking for any signs of water staining, bubbling of the membrane, or deterioration of the sealant. Any damage should be repaired promptly to prevent further deterioration.
Cleaning the drainage system, removing debris and sediment that can obstruct water flow, is also crucial. This could involve using high-pressure water jets or specialized cleaning tools. Furthermore, the pool’s water chemistry should be carefully monitored to prevent corrosion of the drainage components and ensure the overall health of the system. A proactive maintenance approach is significantly cheaper in the long run compared to reactive emergency repairs.
Designing a stunning rooftop pool area requires careful consideration of safety features, like secure fencing and non-slip surfaces, alongside privacy elements such as strategically placed planters or screens. Imagine enjoying the view while sipping a refreshing drink from the rh rooftop menu columbus ; the perfect complement to your luxurious retreat. Back to your poolside paradise, ensuring proper lighting and access control further enhances the overall experience and security of your private oasis.
Privacy and Screening Solutions

Designing a rooftop pool area requires careful consideration of privacy, especially in urban settings or areas with close proximity to neighboring buildings. Effective privacy solutions not only enhance the sense of seclusion and relaxation but also contribute significantly to the overall aesthetic appeal of the space. The choice of materials, design, and integration with landscaping will impact both the effectiveness and the cost of the project.
Privacy Screen Designs Using Various Materials
Several design options exist for creating privacy screens around a rooftop pool. The selection should consider factors like budget, maintenance requirements, and the overall design aesthetic.
Here are three distinct examples:
Design 1: Living Wall. Imagine a lush, verdant wall of climbing plants, such as ivy or jasmine, trained to grow along a framework of vertical supports. This could be a metal trellis system painted a dark, neutral color to blend with the surroundings, or even a more rustic wood framework for a warmer aesthetic. The plants would reach a height of approximately 8-10 feet, providing excellent visual screening and a natural, calming ambiance.
The overall aesthetic is one of sophisticated natural beauty, enhancing the luxurious feel of the pool area.
Design 2: Modern Slatted Screen. This design features a sleek, contemporary screen constructed from horizontal or vertical slats of weather-resistant timber or composite material. The slats would be spaced to allow for some filtered light and airflow, while still providing substantial privacy. The height would be around 6-8 feet, and the color could be chosen to complement the overall color scheme of the pool area.
The aesthetic is clean, minimalist, and modern, ideal for a contemporary rooftop design. The slats could be spaced closer together for increased privacy.
Design 3: Combination Screen with Planters. This option combines a low, solid wall (approximately 3 feet high) made from concrete or stone with integrated planters. These planters would house taller shrubs or small trees, extending the height of the privacy screen to around 6-7 feet. The solid wall provides a sturdy base, while the plants add a softer, more natural element. The aesthetic is a blend of modern structure and organic beauty, offering a balance of visual interest and privacy.
Comparison of Privacy Solution Effectiveness and Cost
The effectiveness and cost of different privacy solutions vary considerably. The following table provides a comparison of the three designs discussed above:
| Privacy Solution | Effectiveness | Cost (Estimate) | Maintenance |
|---|---|---|---|
| Living Wall | High; provides excellent visual and sound buffering | Medium-High; initial investment in structure and plants, ongoing maintenance | Regular watering, pruning, and potential plant replacement |
| Modern Slatted Screen | Medium-High; provides good visual privacy, some sound buffering | Medium; material cost and installation | Low; occasional cleaning and potential repairs |
| Combination Screen with Planters | High; solid wall provides a base, plants enhance privacy | Medium-High; cost of wall construction and plants, ongoing maintenance | Moderate; watering, pruning, and potential plant replacement |
Impact of Privacy Solutions on Natural Light and Ventilation
Privacy solutions can impact natural light and ventilation. Solid walls or densely planted screens significantly reduce both. Slatted screens offer a balance, allowing filtered light and airflow. Careful consideration of material selection and spacing is crucial to minimize negative impacts. For example, a living wall, while offering excellent privacy, may reduce sunlight penetration.
To mitigate this, the wall could be positioned to maximize sunlight during certain parts of the day. Conversely, a slatted screen could be designed with wider gaps between slats to improve ventilation and natural light penetration.
Landscaping Integration for Enhanced Privacy and Aesthetics
Strategic landscaping significantly enhances both privacy and aesthetics. Taller shrubs and trees planted along the perimeter of the pool area create natural barriers. Using a mix of evergreens and deciduous plants provides year-round screening while adding visual interest. For example, planting bamboo around the perimeter creates a lush, natural screen that adds a tropical feel. The placement of strategically positioned planters with flowering plants or aromatic herbs adds another layer of beauty and fragrance, enhancing the sensory experience of the rooftop pool area.
Accessibility and Universal Design
Designing a rooftop pool area requires careful consideration of accessibility to ensure everyone can enjoy the space. Universal design principles, focusing on creating environments usable by all people to the greatest extent possible, are crucial for inclusive design. This means considering the needs of individuals with a wide range of abilities and disabilities from the outset, rather than as an afterthought.
A truly accessible pool area welcomes people of all ages and abilities, promoting inclusivity and enjoyment for everyone.
Implementing universal design in a rooftop pool area goes beyond simply meeting minimum accessibility standards. It involves proactively designing features that are inherently usable by everyone, regardless of their physical capabilities. This holistic approach improves the overall experience for all users, not just those with disabilities. For example, a wider walkway is beneficial to everyone, whether pushing a stroller or navigating a crowded area.
Accessible Pathways and Ramps
Smooth, level pathways are essential for wheelchair access. These pathways should have a minimum width of 5 feet (1.5 meters) to allow for easy maneuvering of wheelchairs and other mobility devices. Ramps, if necessary to overcome changes in elevation, should have a maximum slope of 1:12 (a 1-foot rise for every 12 feet of run), and should include handrails on both sides, extending at least 12 inches beyond the top and bottom of the ramp.
For instance, a ramp leading from the building’s entrance to the pool deck could be 12 feet long with a 1-foot rise, providing a gentle and safe incline. The surface should be non-slip, perhaps using textured concrete or anti-slip tiles.
Pool Lifts and Transfer Systems
For individuals who cannot safely enter the pool via steps or ramps, a pool lift is a crucial accessibility feature. Pool lifts are hydraulic devices that gently lower a person from a seated position into the water. These lifts should be strategically located near the pool edge, with sufficient space for maneuverability. A minimum of 36 inches of clear space around the lift is recommended.
The lift should be easy to operate, with clear and simple controls. Furthermore, a transfer system, such as a transfer bench, can assist individuals in moving from a wheelchair to a pool chair and then into the water. A transfer bench should be positioned close to the pool’s edge, allowing for a smooth and safe transfer.
Handrails and Grab Bars
Handrails and grab bars are essential for stability and support around the pool area. These should be strategically placed along pathways, near entrances, and around the pool itself. Handrails should be 32-36 inches high and have a diameter that allows for a comfortable grip. Grab bars in the pool area, especially near entrances and exits, should be securely mounted and able to withstand significant weight.
For example, robust stainless steel grab bars installed around the pool’s edge provide secure support for those entering or exiting the water. Their placement should be carefully considered to facilitate comfortable and safe movement.
Accessible Pool Entry
The pool itself should feature accessible entry points. This could include a sloped entry, a ramp leading into the pool, or a designated accessible entry point with a pool lift. The water depth at the entry point should be shallow, allowing for easy and safe entry and exit. The pool floor should be non-slip and textured to prevent accidents.
The pool’s edge should also be a consistent height to avoid tripping hazards. For instance, a sloped entry could have a gradual slope, allowing for easy access with a wheelchair or other mobility device. This eliminates the need for a separate lift, providing a simpler and more integrated solution.
Universal Design Example: A Rooftop Pool Area Layout
Consider a rooftop pool area with dimensions of 50ft x 30ft. A 5-foot-wide pathway encircles the pool, providing ample space for wheelchairs and strollers. A gently sloped ramp (1:12) leads from the building’s entrance to the pool deck, with handrails on both sides. A pool lift is located near the ramp, offering convenient access for those who need it.
A transfer bench is placed next to the pool’s edge for easy transfers. Handrails are installed around the pool and along the pathway. The pool itself features a sloped entry at one end, allowing for easy access. All surfaces are non-slip and textured for safety. The entire area is designed with ample space for maneuvering, clear sightlines, and easy navigation for everyone.
Pool Equipment and Maintenance

Maintaining a rooftop pool requires diligent attention to equipment and a consistent maintenance schedule. The right equipment ensures clean, safe, and enjoyable swimming, while regular maintenance extends the lifespan of your investment and prevents costly repairs. Choosing the correct equipment and establishing a routine are crucial for a successful rooftop pool.A well-maintained pool is more than just aesthetically pleasing; it’s essential for hygiene and safety.
Neglecting maintenance can lead to bacterial growth, equipment failure, and potential health hazards. This section details the essential equipment, selection criteria, a maintenance schedule, and energy-efficient operating practices.
Essential Pool Equipment
Essential pool equipment includes a filtration system, pumps, and cleaning systems. The filtration system removes debris and impurities, keeping the water clean and clear. Pumps circulate the water through the filtration system, ensuring consistent cleaning. Cleaning systems, such as automatic pool cleaners, assist in removing debris from the pool floor and walls, reducing manual cleaning time. The size and capacity of these components directly impact the effectiveness of the pool’s overall maintenance.
Selection Criteria for Pool Equipment
The selection of pool equipment hinges on the pool’s size, anticipated usage, and budget. Larger pools naturally require more powerful pumps and larger filtration systems to maintain water quality. High-usage pools, such as those in a busy apartment complex, will necessitate more robust and efficient equipment to handle the increased workload. Budget considerations will influence the choice between high-end, energy-efficient models and more basic, cost-effective options.
For example, a small rooftop pool for a single-family home might suffice with a smaller, single-speed pump and a cartridge filter, while a larger community pool would require a larger, variable-speed pump and a sand filter for superior filtration and energy efficiency.
Pool and Equipment Maintenance Schedule
A regular maintenance schedule is paramount for a healthy and functional pool. The following tasks should be performed at the specified frequencies:
- Daily: Skim the surface of the water to remove leaves and debris; check the chemical levels (pH, alkalinity, sanitizer) and adjust as needed.
- Weekly: Vacuum the pool floor and walls; brush the pool walls and floor to remove algae and other debris; check the equipment for any leaks or malfunctions.
- Monthly: Backwash or clean the filter; check and clean the pool pump strainer basket; inspect and clean the skimmer basket; test and adjust water chemistry; inspect the pool deck and surrounding areas for any damage.
- Quarterly: Have the pool water professionally tested for accurate chemical balance; inspect and clean the pool’s plumbing system; inspect and clean the pool’s heating system (if applicable); inspect and lubricate all moving parts of the equipment.
- Annually: Have the pool equipment professionally inspected and serviced; drain and clean the pool; replace any worn or damaged parts; consider professional pool cleaning services for a thorough deep clean.
Energy-Efficient Pool Operation
Energy efficiency in pool operation translates to cost savings and reduced environmental impact. Utilizing variable-speed pumps, which adjust their speed based on demand, offers significant energy savings compared to single-speed pumps. Using a pool cover reduces evaporation, minimizing the need for water replenishment and reducing energy consumption for heating. Regularly cleaning and maintaining the pool equipment ensures optimal performance and reduces energy waste.
Implementing smart pool controls allows for scheduling and automation of pool functions, further optimizing energy usage. For instance, a variable-speed pump can operate at a lower speed during off-peak hours, saving energy without compromising water quality. Similarly, using a solar pool cover can significantly reduce the need for heating, leading to considerable energy savings.
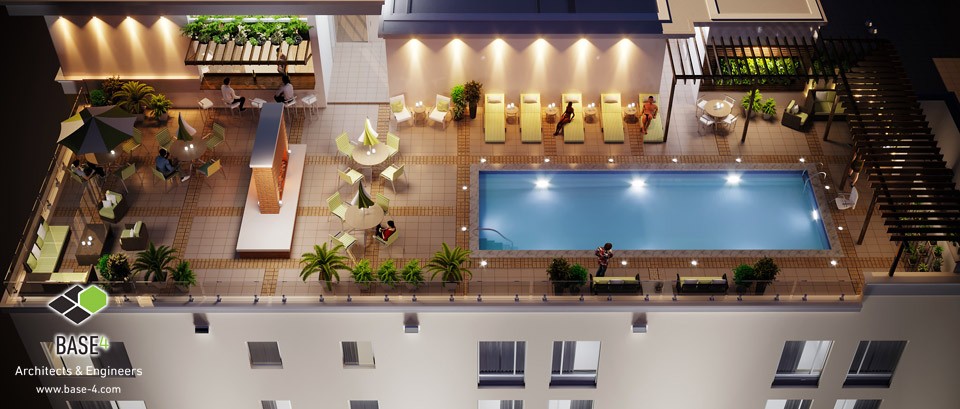
Lighting and Ambiance
Creating the perfect ambiance for a rooftop pool area requires a carefully planned lighting scheme that balances functionality with aesthetic appeal. The goal is to transform the space from a simple pool deck into a luxurious and inviting oasis, perfect for relaxation and entertainment at any time of day. This involves considering not only the type of lighting but also its placement, intensity, and color temperature to create a mood that shifts seamlessly from daytime sun-drenched relaxation to a magical nighttime escape.The selection of lighting fixtures and their placement are crucial in achieving the desired effect.
Different areas will require different lighting solutions. For instance, brighter, more functional lighting is needed near the pool’s edge and steps to ensure safety, while softer, ambient lighting is ideal for lounging areas and dining spaces.
Lighting Fixture Selection and Placement
Strategic placement of various lighting fixtures is key. Imagine recessed LED lights lining the perimeter of the pool deck, providing a soft, even glow that highlights the pool’s contours without creating harsh shadows. These recessed lights can be complemented by strategically placed bollard lights along pathways, guiding guests safely while adding a touch of elegance. For the lounging areas, consider pendant lights or stylish floor lamps that cast a warm, inviting light.
These could be positioned near comfortable seating arrangements, creating intimate and relaxing pockets of light. Finally, accent lighting, such as uplighting on architectural features or water features, can add depth and drama to the overall design. The use of dimmers on all fixtures allows for complete control over the ambiance, adapting the lighting to different moods and times of day.
Lighting Technologies and Energy Efficiency
LED lighting is the clear winner for rooftop pool areas due to its energy efficiency, longevity, and versatility. Compared to incandescent bulbs, LEDs consume significantly less energy, resulting in lower electricity bills and a smaller carbon footprint. For example, a 10-watt LED bulb can produce the same amount of light as a 60-watt incandescent bulb, representing a substantial energy saving.
Furthermore, LEDs have a much longer lifespan, reducing the frequency of bulb replacements and associated maintenance costs. While incandescent bulbs offer a warm, inviting glow, their energy inefficiency makes them a less practical choice for a large-scale project like a rooftop pool area.
Creating a Relaxing and Inviting Ambiance
Achieving a relaxing and inviting ambiance through lighting is about more than just brightness; it’s about creating layers of light and shadow. Warm-toned lighting, particularly in the lower intensity range (2700-3000 Kelvin), promotes relaxation and creates a cozy atmosphere. This can be achieved using warm white LED lights in pendant fixtures and floor lamps. In contrast, cooler-toned lighting (around 4000-5000 Kelvin) can be used in functional areas like walkways to ensure safety and visibility without detracting from the overall ambiance.
The strategic use of dimmer switches allows for fine-tuning the intensity of the light, creating different moods depending on the time of day or the desired atmosphere. For instance, a softly lit pool area at night, with subtle uplighting on surrounding plants, can create a truly magical and romantic setting.
Overall Lighting Design: Visual Description
The overall lighting design envisions a multi-layered approach, combining functional and ambient lighting to create a dynamic and inviting atmosphere. The color temperature will range from warm white (2700-3000K) in lounging areas to neutral white (4000-5000K) in pathways and around the pool itself. Intensity levels will be adjustable via dimmers, allowing for flexibility depending on the time of day and the desired mood.
The effect will be a seamless transition from bright, functional lighting during the day to a soft, romantic glow at night, creating a truly unforgettable experience for those enjoying the rooftop pool. Imagine the gentle shimmer of the water reflecting the warm glow of the LED lights, creating a mesmerizing spectacle under the night sky.